occasionally I have to silver solder something, and holding the parts in alignment is a real pain. the commercial product below is worse that useless - complete POS
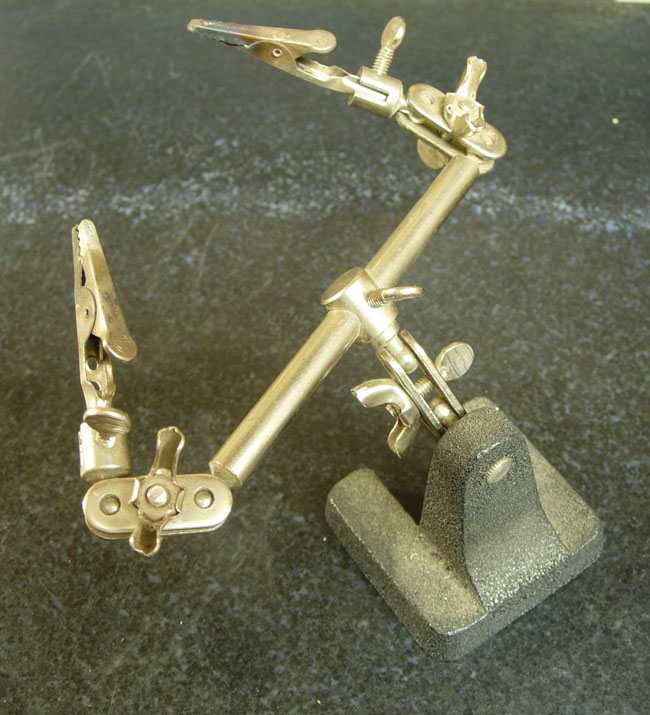
so i made of the following. fairly simple, uses solid cotters
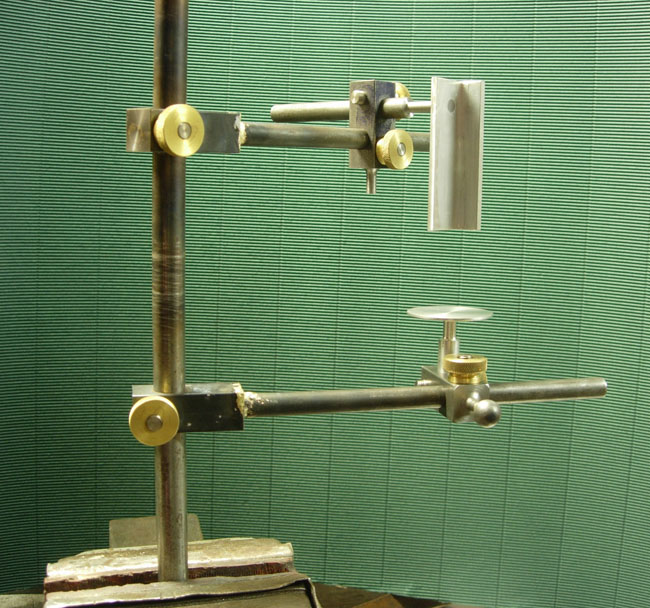
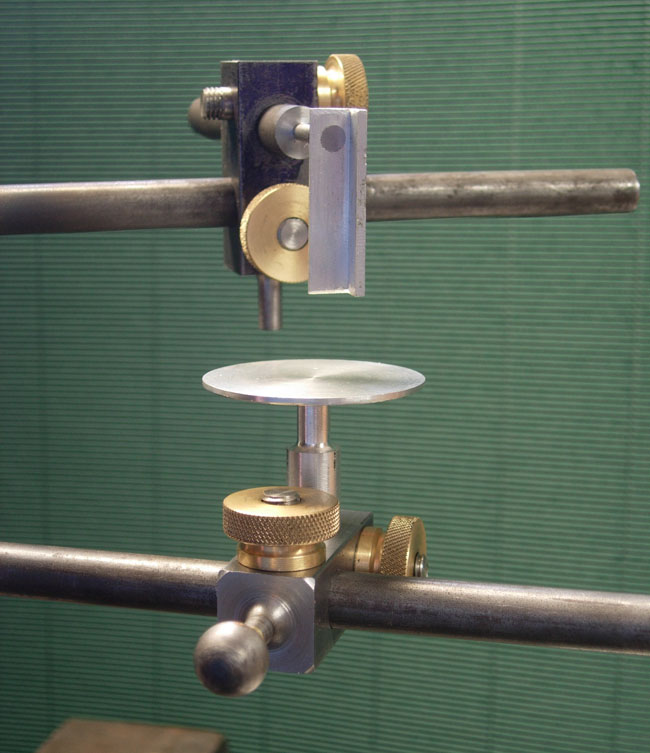
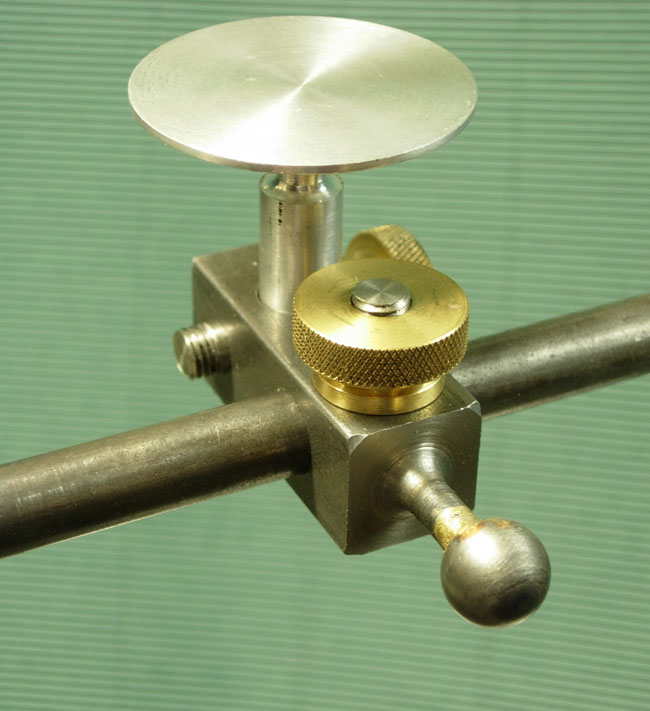
the ball on the last one is for to-be-built arms (one day) the work surfaces are AL so SS doesn't stick and are thin so as not to be heat sinks. the small V-block is angle milled thin and peened onto the shaft, there's also a large one not shown. the larger black spring paper clips (if that's what there called) are good for clamping, although all manner of attachments could be made
http://bbs.homeshopmachinist.net/showthread.php?t=14957
Forrest Addy posted the following tips on silver soldering:
Here's from a piece I contributed to the HSM Tips book:
I have years of experience joining metals with silver bearing alloys as a part of my trade. The process is called variously "silver soldering" or "silver brazing". Purists will argue the call indefinitely. I prefer "silver brazing" but the name isn't really that important so long as it's in common use and all agree to the process the term covers.
A prospective maker of tools needs skill and know-how in the selection and use of silver brazing materials and processes. The parts to be joined have to be snugly fitted and cleaned to bright metal, free of oil or other organics (including abrasive cloth residues which inevitably includes powered glue bonding agent). Silver brazing alloys feature high surface tension, high strength, and sudden melting points. The heat source can be anything from a home center Burnz-o-Matic torch, to acetylene, to oxy-hydrogen, to a charcoal grill. All you really need is enough reducing heat that rapidly raises the temperature of the work to brazing heat.
I recommend Harris Safety Silv #56 (I know, phony sounding name, but this stuff has been widely used for generations) and Harris white brazing flux for small brazing projects. Use the black flux for larger projects where a longer 'active time' is necessary. This is available from most any welding supply house in your area. These products are specifically recommended for bonding ferrous alloys to ferrous and copper alloys. The flux in a 6.4 oz plastic jar costs about $7 and the silver as 1/16" wire in a 1 troy oz coil costs about $18. It takes me a few years to consume an ounce of silver brazing alloy wire.
Captive joint fit-ups (a socket joint for example) needs 0.002 to 0.004" total clearance for proper silver penetration. More if the captive part expands more rapidly than the socket (brass or copper in a steel socket). If you set up the joint correctly capillary action of the silver will try to center the components reducing the eccentric displacement you'd ordinarily expect to a fraction of the total clearance.
Have everything on hand, fully cleaned and prepared, even to a 6 to 10" length of the silver wire scrubbed clean with steel wool. Straighten a length and use it right off the coil. Don't cut it; the coil makes a convenient handle
Once the joint has been prepped, devise a means of holding the work in alignment. Thoroughly clean the parts and swab them liberally with flux. Apply heat to the work. The flux will boil from the heat, and as the water flashes off, the flux will turn white. As heating progresses the flux clarifies and begins to look like clear syrup. Procede heating to work to a dull redheat as seen in dim light. Warm the silver and dip it in the flux jar. Warm it again until the flux turns to syrup and apply a dab to the work. It requires a bit of coordination. A lot happens quickly when the work gets to temperature so don't practice on elaborate, hard to replace work.
There will be an instant when the work and the silver arrive at the melting point. The skill of the torch wielder is determined when they both arrive at the melting point at the same instant. A tiny bead of silver sitting on the joint crevice makes a good indicator. It will sit there and glisten then suddenly disappear into the joint like a cockroach into a crack. This will be at a low red heat visible in room light - about 1200 degrees. When the bead disappears apply more silver and a bit more heat working around the joint until the joint brims. Stop and look. Extra silver and heat will not improve the joint.
Allow the work to cool a bit in position before quenching it. Quench only work that tolerates it. HSS and carbide are likely to crack. The flux will tightly adhere like porcelain enamel but it softens after 20 minutes in boiling hot water and then it's easy to remove with a stiff brush. This is an important step because the flux is acidic and hygroscopic. Adherent residues will cause rust on iron or steel and you cannot satisfactorily paint over any kind of flux.
Cast iron silver brazes poorly because the surface graphite interrupts the flow. Glass bead the cast iron's joint area to white metal immediately before brazing. Move briskly in humid weather or if the bead blasting air is moist. Moist cast iron will form an invisible, silver resistant oxidation almost instantly.
Carbide also forms a surface film that resists brazing. I strop the carbide on a diamond sharpening stone to bright metal where I want the silver to stick. Since the film is much softer than the carbide bead blasting also works very well.
Make a couple of long pokers to push and pull the small bits where they need to go. The capillary action of the silver is sometimes enough to shift even medium sized pieces out of position. Simple 3/16" dia bare steel rods 10" long stuck in wood file handles work well. Don't use brass or stainless. An accumulation of dirty black oxide will reduce the tendency of the flux and silver to make the pokers a permanent part of the project.
The flux jar once opened poses a maintenance problem. Keep the jar threads and the lid clean so it seals tightly. If the flux in the jar dries to a sugary looking cake, add a few drops of water and heat it in boiling water. Stir it to a thick but creamy consistency adding drops of water until its about like gel toothpaste. Read the label. Silver brazing flux contains irritants. Wash up afterwards.
Note: some HSS tool steels hold up better to silver brazing heat. Molybdenum HSS, like M2 and M4, soften somewhat and lose edge durability. T-4 holds its hardness much better. Although T-4 is more expensive and would ordinarily be overkill if used on woodworking tools, its edge holding after a spell of silver brazing temperature dictates its selection.